Documentation#
Stellarphot is a package for performing photometry on calibrated (reduced) astronomical images. It provides a simple interface for performing aperture photometry of either a single image or a directory with multiple images. It is designed to be easy to use for both non-programmers and programmers.
Installation#
If you are testing a pre-release version of stellarphot we recommend setting up a virtual environment and installing stellarphot in this environment.
Only use one of the methods below for making a virtual environment.
Creating an environment with conda or mamba (use whichever one you have installed):
mamba create -n stellarphot-test python=3.11
mamba activate stellarphot-test
pip install --pre stellarphot
Creating an environment with virtualenv:
python -m venv stellarphot-test
source stellarphot-test/bin/activate
pip install --pre stellarphot
To install stellarphot without creating an environment, use:
pip install --pre stellarphot
You can remove stellarphot with:
pip uninstall stellarphot
Getting Started#
Overview#
You will go through this process to do photometry.
You need to make some settings, like camera properties, observatory information, and passband maps. You may only need to do this step once if you use the same equipment for all of your observations.
Settings specific to an object need to be made:
night of data, like the photometry aperture radius, need to be made.
a list of the sources for which you want to perform photometry. These lists can be re-used.
Review all of the settings that the photometry routines will use.
Once those settings have been done, you can perform photometry on your images.
Graphical interface for making settings and doing photometry#
A graphical interface is provided via JupyterLab to make settings. To start JupyterLab, run the following command in a terminal:
jupyter lab
If you open up JupyterLab, the launcher should have a section that looks like this:
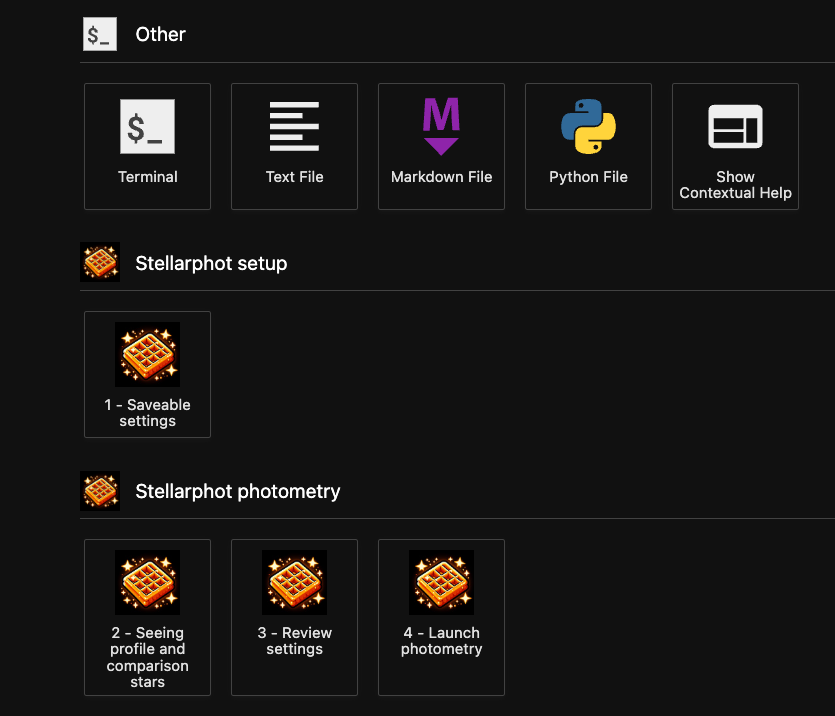
Each of the notebooks corresponds to the steps in the previous section. Open each notebook in order, and run all of the cells in the notebook. In each will be a graphical interface to enter the camera and other settings (in notebook 1), measuring the seeing and choose comparison stars (in notebook 2), review all of your settings (in notebook 3), and perform photometry (in notebook 4).
When the photometry is done there will be a new notebook called photometry_run.ipynb that will have a record
of the photometry that was done.
Editing a settings file directly#
The settings file is a JSON file that can be edited in any text editor.
Performing photometry from within a Python script#
Once you have made your settings doing photometry is a two line process. First, you create a photometry object:
from stellarphot.photometry import AperturePhotometry
from stellarphot.settings import PhotometryWorkingDirSettings
photometry_settings = PhotometryWorkingDirSettings().load()
phot = AperturePhotometry(settings=photometry_settings)
Then you can perform photometry on a single image:
phot(image)
If you have a directory of images you can perform photometry on all of them at once like this:
phot(directory, object_of_interest="M13")
- stellarphot Documentation
- Reference/API
- stellarphot Package
- stellarphot.core Module
- stellarphot.differential_photometry Package
- stellarphot.gui_tools Package
- stellarphot.io Package
- stellarphot.photometry.photometry Module
- stellarphot.photometry.source_detection Module
- stellarphot.plotting Package
- stellarphot.transit_fitting Package
- stellarphot.transit_fitting.gui Module
- stellarphot.transit_fitting.io Module
- stellarphot.transit_fitting.plotting Module
- stellarphot.utils Package
- Reference/API
- Settings
- Reference/API